On
Stereotomy Blog I've been running a series of posts on classic French carpentry drawing techniques. I illustrate somewhat obscure drafting constructions in 3D in order to visualize the geometry on which they are based. This falls in the realm of technical illustration, in which rendering is not photo-realistic, but more "artistic" with the goal of communication and clarity. I have used the open source package
Blender for all these illustrations, and I thought it would be interesting to explain some of the methods I used.
The topic of the series is carpentry, so it is critical to be able to render wood in a convincing way. The most important feature of wood planks and timbers is the grain, which results from cutting flat planes through the cylindrical tree rings in a tree trunk. Broadly speaking, tree rings result from fast and slow growth at different times of the year. The orientation of the grain has important consequences for the strength of structural members and joints. It also has a large effect on the movement of wood with time: wood swells and shrinks radially across its rings, but hardly at all along the original length of the tree. In some applications it is important to orient two pieces so that, for example, the young wood from the top of a tree is abutting or the outer growth rings end up next to each other.
The patterns resulting from the tree structure are readily apparent on cut boards. The end grain shows the characteristic tree rings, while the faces of a board will show different patterns depending on how the board was cut from a log. This site has some good illustrations of the different possibilities. Also, There are fewer rings at the top of a tree, which produces a diagonal orientation to the grain on some sides of a board and, if the board is cut near the center of a log, a distinctive wishbone pattern. If we can show these features in an illustration, then the reader will instantly know how a particular timber or board should be oriented.

In the 3D modeling world, wood grain is best implemented as a procedural texture which calculates the surface color at every visible point. We can thus develop a mathematical model that mimics the ring structure of a tree and use it to drive the procedural texture. In Blender, the most flexible way to develop a procedural texture is to use the material node editor, which enables the modeler to assemble networks of building blocks that calculate the surface properties of an object.
Here is our wish list of wood texture features:
- The texture should be easy to apply to a 3D object that represents a particular timber or board. It should be aligned with the local orientation of that timber.
- The texture needs to model the growth rings of a tree. Physical characteristics should be represented: tree rings get closer together at the outside of a tree and, as mentioned before, there are fewer tree rings at the top of a tree. The actual spacing of the rings is not critical. A physically correct model might produce so many rings that we would get severe aliasing at the scales which interest us. Also, there is a wide variation in the spacing. Nevertheless, the rings must be suggestive.
- For artistic purposes, the modeler should be able to specify the light and dark colors of the ring. Also, there should be some variation in the rings: growth rates are different from year to year, and tree trunks are not all perfectly round.
- The grain should look good and not exhibit aliasing artifacts, or at least provide ways for the modeler to avoid aliasing. On the other hand, the grain texture is not photo-realistic. I don't care at all about knots in the wood, nor about the reflectance properties of the wood at a micro level.
Blender's Wood Texture
Blender already has a wood texture. Here is an example of it applied to a rectangular shape:
I am not showing the texture in an attractive light. It can be used to render convincing wood, as shown in
this tutorial. The point of my rendering is to demonstrate that its structure is made of concentric spheres. This isn't suitable for rendering the cylindrical structure of a tree trunk unless you stretch it out in one direction or only use a 2D slice of the texture. Even if we did that, it would still be complicated to implement the other features we want, such as having fewer rings at the top of the tree. We could use this built-in texture as a basis for the repeating pattern of our texture, but we will get more flexibility from implementing our own periodic function.
Age from Radius
Our procedural shader, implemented as a Blender material node network (called a "noodle" in the blender world), will take as input coordinates from the surface of a piece of wood, calculate the age of the tree at that point and thus the corresponding ring color. If our modeling scale is in centimeters, for our initial effort we can assume that a tree's radius grows at 1 centimeter per year and so use the radial distance from the center of the tree as the age.
We now need to choose the proper coordinate system in which to calculate that distance. Blender provides coordinates that are called "generated" coordinates or "Orco" (for Original Coordinates) in different parts of the program. These are conveniently aligned with the local orientation of an object and its origin, but by default they are scaled to the bounding box of the object, which is not good. Fortunately you can turn off this scaling. This screen shot shows the desired option choice in the mesh panel:
Note that the sample timber's origin is in the middle of the end face, and its X axis extends along its length.
We know how to get the age from the radial distance, and we can derive a function that ranges from 0 to 1 during year by using the non-integer part of the age. That will give us a value that can be used almost directly to choose a color. Blender doesn't have a truncate function, but it does have rounding function, and we can use that, after subtracting .5 from the value, to get the integer part, then do another subtraction to get the non-integer part. However, if we used that value as is, we would get terrible aliasing at the sudden transition from 1 to 0 at the end of the cycle. We use a color ramp and choose a cubic interpolating spline to get a smooth transition.
Here is our first effort at a node network:
We use "orco" coordinates as input to the process. First, we use the mapping node to 0 the X coordinate, so we only deal with radial distance from the center of the trunk. We then get the length of the coordinate vector, with dot product and square root, and feed that to the truncating process described above. This gives us this initial result:
Not bad, but not very interesting. The grain is absolutely parallel to the long axis of the timbers. The pattern on the long surfaces, tangential to the tree rings, is not very convincing.
The first improvement we can make is to simulate the fact that vertical growth happens at the top of a tree, which implies that there are fewer rings as one climbs the tree. We implement this by adding a value that increases as we move up the tree trunk to our radius / age calculation before truncating it; this has the effect of moving the pattern in towards the origin as we move up the tree. Here's the next effort at a node network:
and the rendering:
Now, the grain appears to be diagonal to the length of the timber, and the surface that cuts through the top of the rings has a wishbone pattern that is reasonably realistic.
Several factors cause the radial growth of a tree to slow down as it gets older. There is a fixed number of cells at the outside of a tree where growth occurs; these cells spread out and have less capacity to grow outwards. Also, a tree simply becomes less "vigorous" with age. Foresters use very complicated empirical models to estimate tree growth. I will choose a simple logarithmic function that captures the basic idea of a the rings getting closer together. It is plausible that a tree trunk would grow as much in its first 50 years as it does in the 500 years after that. The inverse of a logarithmic growth function is an exponential function; we implement that in our node network, and after trying some different values we arrive at this:
and get these results:
The first few rings are a little far apart in this model, but the older grain looks pretty good. We can play with the scale factor applied to the exponential to get the desired look.
We are now ready to move from black-and-white to real wood colors. The output of the color ramp node is used to choose the mixture of the dark and light wood colors. The Blender mix node implements this:
and we are starting to get something that looks like wood:
One remaining fault of our scheme is that the center of the tree trunk is fixed at the center of the 3D object, so that the oldest rings always appear on the piece. This isn't particularly realistic: lumber could come from any part of a big tree. It is easy enough to relocate an object's origin in Blender, but it becomes inconvenient to manipulate the object if the origin is completely outside it. In my models I like to fix the origin to a corner of a timber. So, we can add a mapping node that displaces the whole ring structure:
with pleasing results:
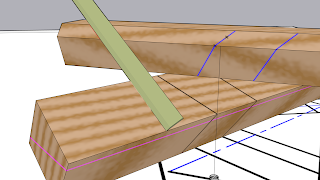
We are more interested in rendering assemblies of wood than isolated boards, and it is here where our texture starts to shine. In showing a portion of a frame corner:
The wood texture clearly shows the grain orientation on the two pieces, and also highlights the joint where they meet. It also looks pretty good. In real life a cabinet maker might not want the joint to be so obvious, but I've chosen exaggerated colors for the early and late growth. In a technical illustration we want to see those joints. If we wanted to make a more realistic rendering, even though that is not one of our objectives for the texture, we would simply choose different colors.
There are still some problems with the texture. The rings are perfectly circular and regular, with no variation from year to year or around the circumference of the tree. The material node network is flexible, but the various parameters are scattered around it and would be painful for a user to manipulate. Also, it will be messy to copy the network into all the various wood materials that we might wish to correct. In the next installment, we will tackle the first issue using noise textures and the others using Blender node groups.


