Wednesday, December 07, 2016

Changing imaxima's Output Font

I use imaxima from Emacs to interact with the Maxima symbolic algebra system. imaxima produces nicely typeset output from the results of Maxima, instead of crude ASCII graphics, and also supports embedding plots and drawings directly in an Emacs buffer. imaxima works by running LaTeX on the output of each Maxima command you enter; it then uses Ghostscript to produce an image that is displayed in the output buffer.

I also use the Solarized color theme with Emacs, which I find quite easy on my eyes. However, there is a problem: imaxima output, which uses Computer Modern fonts by default, becomes quite hard for me to read:

cm-cropped.png

The anti-aliasing performed by Ghostscript interacts with the Solarized colors in a way that makes small letters wash out.

1 Changing the font

Fortunately, it's not too hard to change the font used for imaxima's LaTeX output, but there are a couple of gotchas to keep in mind. This StackExchange question is a good starting point for choosing a font that should work nicely on the screen. The variable imaxima-latex-preamble is defined for just this purpose; in fact, the documentation says "This can be used to change, say, the document font." However, changing this variable's value won't change the font during an imaxima session. It turns out that, at the start of a session, imaxima loads several packages and and definitions into LaTeX and then creates a "LaTeX format file," which is a dump of the LaTeX state. This format file is used when LaTeX is invoked to process each line of Maxima output because this is much faster than loading packages every time. The value of imaxima-latex-preamble is included when the format file is loaded and dumped, so if you change it you need to kill your imaxima buffer and restart before seeing different results.

I chose the Libertine font, which looks nice:

libertine-cropped.png

I achieved this by following the example of that StackExchange page:

(setq imaxima-latex-preamble "\\usepackage{libertine} \\usepackage[libertine]{newtxmath}")

But this leads to the second gotcha.

(%i8) v1:matrix([x,y,z]);

LaTeX error in: \pmatrix{x&\linebreak[0]y&\linebreak[0]z\cr }

The problem is caused by the newtxmath package, which loads the AMS-LaTeX package. Somewhere in there the pmatrix is redefined in an incompatible way. Luckily we can work around this! The maxima distribution comes with a file mactex-utilities.lisp that redefines the function that translates matrix expressions to LaTeX. The new definition emits a call to pmatrix that is compatible with the AMS-LaTeX version.

We could load this file using the Maxima initialization file maxima-init.mac (usually found in the .maxima directory), but we might not want this change for every use of Maxima. I've instead chosen to load the file using a startup hook from Emacs to send the loading command to the imaxima process:

(add-hook 'imaxima-startup-hook
          (lambda ()
            (let ((b (get-buffer "*imaxima*"))
                  (p (get-process "imaxima")))
              (if (and b p)
                  (apply comint-input-sender
                         (list (get-process "imaxima")
                               "load(\"mactex-utilities\");"))))))

Let the math hacking commence!

mactex-utilities-cropped.png

Saturday, April 21, 2012

Blender Wood Texture part 2

In the last post we developed a wood texture that is based on the actual growth process of trees. It looks pretty good, but it lacks any variation that would make it look like wood taken from a real tree: the rings are circular, and the rings follow a strict logarithmic progression in which the interval between each successive ring is smaller. In real life, there is a lot of variation in the ring pattern. The trunk is not necessarily circular, for many reasons, including but limited to: the tree species, presence of nearby trees, prevailing wind direction and strength, and ground slope. The spacing between rings depends on the weather in a given year.

We won't attempt to model the phenomena behind these variations, but we can simulate them as random processes. In computer graphics, "random" usually doesn't mean completely random, because truly random values would introduce horrible artifacts. Instead, we use a source of randomness called Perlin noise. This is an effect that varies a random value (or vector) smoothly in space. A 2D slice of Perlin noise looks a lot like the surface of a cloud; indeed, the Blender Perlin noise texture is called "Clouds." We can access a cloud texture using the generated coordinates from our 3D timber objects, and we can also use any other value we wish to noisify, such as distance from the center of the trunk or tree age, to do a look-up in the cloud texture.

Ring Distortion

The first new variation we will introduce is to the shape of the trunk. We want to slowly change from circular rings at the center of the tree to something that might be quite distorted at the outside. After some experimentation, I've found that it works best to scale the radial distance, which use as the input to the age calculation, by a factor based on the angular position around trunk. We implement this by normalizing the radial vector to a unit circle, doing a lookup in the cloud texture, scaling the noise value down quite a bit to a value near 1, and multiplying our radius value by this. Here is the modified material node network:

and the results:
Although I'm exaggerating the effect in order to show it clearly in the rendering, the results are not bad here. The variation in the circular shape of the rings is indeed more pronounced in the outer rings, and it has introduced interesting changes in the grain pattern on the long surfaces of the timbers. The waviness in the rings apparent on the square timber may not look much like any real tree, but we will see later how we can vary the effect's intensity to achieve the desired look.

Growth Variation

Next, we will vary the distance between rings with a similar node setup that scales the output of our age calculation:

For our test render, I've turned off the previous effect in order to see only the new one:
which is pretty successful. While we have preserved the basic trend of the rings getting closer together at the outside of the tree, there is significant variation in the ring spacing.

After putting the two effects together and reducing the amplitude of the radial variations, we get this:

This is very close to a good wood texture, but there is still a lot of repetition, particularly in the visible grain where a surface grazes a dark ring, such as directly over the center of the tree trunk in the flat board. We can break up this repetition by introducing a bit of noise all over, which we can justify by considering tree growth as an organic process. The noise is introduced at the end of the node network, using 3D position as the input to the noise texture:
and gives an appearance that we will happily use in our technical illustrations:

Node Groups

The final node network is fairly complicated:

It would not be convenient to copy this for different wood materials. We can use Blender's group feature to gather all the nodes into a single block that can be used in many materials in a file, and be linked or appended into other Blender files. Select all the nodes in the material, except for the coordinate input node and the material and output nodes at the end. Then, use the "Group" command from the Node menu. Our network uses two coordinate inputs, but we can have one input to the group and route that value where it is needed inside the group:
When we are done editing the group, the network looks like this:
Much neater, but perhaps not very useful to an artist. For our final refinement, we will expose all the parameters that would be useful for achieving different wood effects as inputs to the group as well as the value used to mix the early and late colors. The new group is impressive in its collapsed state:
The interior of the group is now fairly complex and is starting to strain the ability of the screenshots to illustrate what we are doing. On the left:
and the right:
Some implementation details have been changed because Blender doesn't allow inputs to mapping nodes other than the vector to be transformed.

So, that's our wood grain material. You can download the blend file here and play with it yourself. Time to do some more carpentry illustrations!

Sunday, April 15, 2012

A Wood Texture for Blender

On Stereotomy Blog I've been running a series of posts on classic French carpentry drawing techniques. I illustrate somewhat obscure drafting constructions in 3D in order to visualize the geometry on which they are based. This falls in the realm of technical illustration, in which rendering is not photo-realistic, but more "artistic" with the goal of communication and clarity. I have used the open source package Blender for all these illustrations, and I thought it would be interesting to explain some of the methods I used.


The topic of the series is carpentry, so it is critical to be able to render wood in a convincing way. The most important feature of wood planks and timbers is the grain, which results from cutting flat planes through the cylindrical tree rings in a tree trunk. Broadly speaking, tree rings result from fast and slow growth at different times of the year. The orientation of the grain has important consequences for the strength of structural members and joints. It also has a large effect on the movement of wood with time: wood swells and shrinks radially across its rings, but hardly at all along the original length of the tree. In some applications it is important to orient two pieces so that, for example, the young wood from the top of a tree is abutting or the outer growth rings end up next to each other.

The patterns resulting from the tree structure are readily apparent on cut boards. The end grain shows the characteristic tree rings, while the faces of a board will show different patterns depending on how the board was cut from a log. This site has some good illustrations of the different possibilities. Also, There are fewer rings at the top of a tree, which produces a diagonal orientation to the grain on some sides of a board and, if the board is cut near the center of a log, a distinctive wishbone pattern. If we can show these features in an illustration, then the reader will instantly know how a particular timber or board should be oriented.


In the 3D modeling world, wood grain is best implemented as a procedural texture which calculates the surface color at every visible point. We can thus develop a mathematical model that mimics the ring structure of a tree and use it to drive the procedural texture. In Blender, the most flexible way to develop a procedural texture is to use the material node editor, which enables the modeler to assemble networks of building blocks that calculate the surface properties of an object.

Here is our wish list of wood texture features:

  • The texture should be easy to apply to a 3D object that represents a particular timber or board. It should be aligned with the local orientation of that timber.
  • The texture needs to model the growth rings of a tree. Physical characteristics should be represented: tree rings get closer together at the outside of a tree and, as mentioned before, there are fewer tree rings at the top of a tree. The actual spacing of the rings is not critical. A physically correct model might produce so many rings that we would get severe aliasing at the scales which interest us. Also, there is a wide variation in the spacing. Nevertheless, the rings must be suggestive.
  • For artistic purposes, the modeler should be able to specify the light and dark colors of the ring. Also, there should be some variation in the rings: growth rates are different from year to year, and tree trunks are not all perfectly round.
  • The grain should look good and not exhibit aliasing artifacts, or at least provide ways for the modeler to avoid aliasing. On the other hand, the grain texture is not photo-realistic. I don't care at all about knots in the wood, nor about the reflectance properties of the wood at a micro level.

Blender's Wood Texture

Blender already has a wood texture. Here is an example of it applied to a rectangular shape:
I am not showing the texture in an attractive light. It can be used to render convincing wood, as shown in this tutorial. The point of my rendering is to demonstrate that its structure is made of concentric spheres. This isn't suitable for rendering the cylindrical structure of a tree trunk unless you stretch it out in one direction or only use a 2D slice of the texture. Even if we did that, it would still be complicated to implement the other features we want, such as having fewer rings at the top of the tree. We could use this built-in texture as a basis for the repeating pattern of our texture, but we will get more flexibility from implementing our own periodic function.

Age from Radius

Our procedural shader, implemented as a Blender material node network (called a "noodle" in the blender world), will take as input coordinates from the surface of a piece of wood, calculate the age of the tree at that point and thus the corresponding ring color. If our modeling scale is in centimeters, for our initial effort we can assume that a tree's radius grows at 1 centimeter per year and so use the radial distance from the center of the tree as the age.

We now need to choose the proper coordinate system in which to calculate that distance. Blender provides coordinates that are called "generated" coordinates or "Orco" (for Original Coordinates) in different parts of the program. These are conveniently aligned with the local orientation of an object and its origin, but by default they are scaled to the bounding box of the object, which is not good. Fortunately you can turn off this scaling. This screen shot shows the desired option choice in the mesh panel:

Note that the sample timber's origin is in the middle of the end face, and its X axis extends along its length.

We know how to get the age from the radial distance, and we can derive a function that ranges from 0 to 1 during year by using the non-integer part of the age. That will give us a value that can be used almost directly to choose a color. Blender doesn't have a truncate function, but it does have rounding function, and we can use that, after subtracting .5 from the value, to get the integer part, then do another subtraction to get the non-integer part. However, if we used that value as is, we would get terrible aliasing at the sudden transition from 1 to 0 at the end of the cycle. We use a color ramp and choose a cubic interpolating spline to get a smooth transition.

Here is our first effort at a node network:

We use "orco" coordinates as input to the process. First, we use the mapping node to 0 the X coordinate, so we only deal with radial distance from the center of the trunk. We then get the length of the coordinate vector, with dot product and square root, and feed that to the truncating process described above. This gives us this initial result:
Not bad, but not very interesting. The grain is absolutely parallel to the long axis of the timbers. The pattern on the long surfaces, tangential to the tree rings, is not very convincing.

The first improvement we can make is to simulate the fact that vertical growth happens at the top of a tree, which implies that there are fewer rings as one climbs the tree. We implement this by adding a value that increases as we move up the tree trunk to our radius / age calculation before truncating it; this has the effect of moving the pattern in towards the origin as we move up the tree. Here's the next effort at a node network:

and the rendering:
Now, the grain appears to be diagonal to the length of the timber, and the surface that cuts through the top of the rings has a wishbone pattern that is reasonably realistic.

Several factors cause the radial growth of a tree to slow down as it gets older. There is a fixed number of cells at the outside of a tree where growth occurs; these cells spread out and have less capacity to grow outwards. Also, a tree simply becomes less "vigorous" with age. Foresters use very complicated empirical models to estimate tree growth. I will choose a simple logarithmic function that captures the basic idea of a the rings getting closer together. It is plausible that a tree trunk would grow as much in its first 50 years as it does in the 500 years after that. The inverse of a logarithmic growth function is an exponential function; we implement that in our node network, and after trying some different values we arrive at this:

and get these results:
The first few rings are a little far apart in this model, but the older grain looks pretty good. We can play with the scale factor applied to the exponential to get the desired look.

We are now ready to move from black-and-white to real wood colors. The output of the color ramp node is used to choose the mixture of the dark and light wood colors. The Blender mix node implements this:

and we are starting to get something that looks like wood:
One remaining fault of our scheme is that the center of the tree trunk is fixed at the center of the 3D object, so that the oldest rings always appear on the piece. This isn't particularly realistic: lumber could come from any part of a big tree. It is easy enough to relocate an object's origin in Blender, but it becomes inconvenient to manipulate the object if the origin is completely outside it. In my models I like to fix the origin to a corner of a timber. So, we can add a mapping node that displaces the whole ring structure:
with pleasing results:
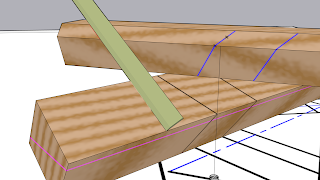
We are more interested in rendering assemblies of wood than isolated boards, and it is here where our texture starts to shine. In showing a portion of a frame corner:
The wood texture clearly shows the grain orientation on the two pieces, and also highlights the joint where they meet. It also looks pretty good. In real life a cabinet maker might not want the joint to be so obvious, but I've chosen exaggerated colors for the early and late growth. In a technical illustration we want to see those joints. If we wanted to make a more realistic rendering, even though that is not one of our objectives for the texture, we would simply choose different colors.

There are still some problems with the texture. The rings are perfectly circular and regular, with no variation from year to year or around the circumference of the tree. The material node network is flexible, but the various parameters are scattered around it and would be painful for a user to manipulate. Also, it will be messy to copy the network into all the various wood materials that we might wish to correct. In the next installment, we will tackle the first issue using noise textures and the others using Blender node groups.

Wednesday, September 01, 2010

The Seamless Engine Goes Global

I've been doing more work on the terrain engine I described in my last post, which I'm now calling "seamless." It now works pretty well on a global scale.


There's still lots of work to do, especially on optimization at the OpenGL level, but I'm quite pleased, especially with how easy it is to get the height and image data out of osgEarth.

I encountered an interesting issue with the Quadrilateralized Spherical Cube that I was planning to use. I did find a good formal reference to the math behind the projection at this site. It turns out that the COBE satellite didn't use the QSC projection, but a slightly simpler one. Anyway, the seamless terrain algorithm requires a good estimate of the edge length of a patch on the grid and also a calculation of the minimum distance from the eye point to the edge. These are both difficult to calculate with the QSC projection, in part because the projection is not differentiable on the diagonals of the cube faces. I came up with another projection in which the grid lines are all great circles on the sphere:


I'm calling this projection an "Euler projection" by analogy to one class of Euler angles in which a rotation is measured with respect to fixed axes. For the equatorial cube faces, the vertical grid lines are the same as meridians of longitude, but the "latitude" is measured perpendicular to the horizontal axis, not in the longitudinal plane. The fact that the grid lines are now all segments of great circles makes the math almost trivially easy.

Now, we're not displaying a sphere (unlike some programs :) but an ellipsoid, so this measure will break down as we get close to the earth, but I'm prepared to hack that problem away.

The source to the seamless engine is available from this Git repository. Compilation requires osgEarth and Open Scene Graph from SVN and the whole thing is still a bit raw.

Sunday, August 15, 2010

a terrain engine for osgEarth

Lately I've been working on an experimental terrain engine for osgEarth on behalf of the folks at Pelican Mapping. osgEarth is a cool project that imports a variety of geographic raster and vector data into Open Scene Graph without requiring a lengthy pre-processing step. I've implemented the algorithm described in Seamless Patches for GPU-Based Terrain Rendering. The main feature of this technique is that LOD is determined at the patch edges, so that the polygons on either side of an edge always line up. The four triangles of a square patch may have different resolutions and are stitched together by a small number of strips. Here's a scene with Mt. Fuji:


And the wire frame view:


Of course, the objective is to get to a whole-earth scheme. I'm going with a projected cube approach, where the basic seamless algorithm is run on the six sides of the cube. I like the Quadrilateralized Spherical Cube which was developed for processing the data from the NASA Cobe satellite. A nice property of the projection is that is equal-area, so that a recursive devision in the cube face space should result in 4 equal-area spherical quads on the earth. It looks pretty:


Here's hoping that the calculation of the projection doesn't become a big bottleneck. Incidently, it was very hard to find the equations describing the projection: I eventually found a nice formulation here. But beware: there's a typo in Equation 3-38. "cos(theta)" should be "cos(phi)."

Wednesday, June 30, 2010

Cool Links

Here are some cool blogs I've come across recently. Virtual Globe and Terrain Rendering is devoted to a book-in-progress of the same name and has a nice collection of links to resources and other interesting blogs. RasterGrid has good articles on new features of OpenGL; I especially like Instance Culling Using Geometry Shaders, about doing culling on the GPU, and Uniform Buffers vs Texture Buffers. For an old graphics fossil like me, these are great topics in modern 3D graphics programming. Also, the Outerra engine guys are doing cool stuff and writing about it too. I've added these to my blog list, and so should you!

Wednesday, June 16, 2010

Everything You Always Wanted to Know About StateSets (But Were Afraid to Ask)

Here's part 2 of my articles on Open Scene Graph graphics state management. Part 1 covered the StateSet class, which OSG programmers should be familiar with. This part looks behind the scenes at how the OSG "backend" optimizes rendering for minimizing graphics state changes. Enjoy!